
How to Extend the Lifespan of Your Stucco Exterior
Traditional hard-coat stucco is rated for 50–80 years. Most stucco in NJ and PA doesn’t reach that. The gap between rated lifespan and actual lifespan comes down to a handful of specific failure points — most of which are preventable with simple, low-cost actions.
The actions that extend stucco lifespan are not complicated — but they’re specific. General advice like “clean it regularly” and “fix cracks promptly” is true but incomplete. The interventions that actually move the needle on longevity are more targeted than that, and most cost under $200 a year.
This guide focuses on why stucco fails prematurely and what prevents each failure mode. For the seasonal timing of these tasks — what to do in spring, fall, and winter specifically — see our seasonal maintenance checklist. This article covers the underlying mechanics and priorities.
What Actually Determines Stucco Lifespan
Stucco deteriorates through one primary mechanism: water reaching the wood substrate behind it and staying there long enough to cause rot. Everything else — surface cracking, color fade, algae growth, spalling — is either cosmetic or a downstream consequence of that moisture process.
That means lifespan extension is primarily about moisture management, not surface appearance. A stucco wall that looks weathered and slightly chalky but has dry substrate and intact flashing will outlast a freshly painted wall where water has been entering around a failed window seal for two years.
The three mechanisms through which water reaches the substrate in NJ and PA stucco homes, in order of frequency:
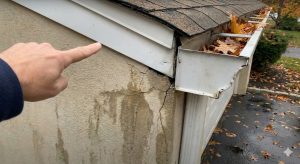
- Failed perimeter caulk at windows and doors — the most common and most preventable cause of premature stucco failure across the region
- Missing or failed flashing at roof-to-wall junctions, window heads, and sill pans — often a construction deficiency present from day one, rather than a maintenance failure
- Grade contact — stucco touching or buried in soil at grade level, creating a permanent moisture wick against the base of the wall
Surface cracks — the thing most homeowners focus on — rank fourth or lower as an entry point. Hairline field cracks in hard-coat stucco do not allow water entry under normal rain conditions. Filling them is cosmetic maintenance. Replacing failed caulk at a window is structural maintenance. Understanding this distinction is the foundation of an effective longevity strategy.
The Highest-ROI Maintenance Action: Caulk
Of all the things you can do to extend stucco lifespan, maintaining the perimeter sealant at windows and doors delivers the best return on investment by a significant margin. Here’s the math: a tube of high-performance silicone sealant costs $12–$18. Professional re-sealing of all windows on a typical NJ home runs $150–$400. The moisture damage that failed caulk causes — sheathing replacement, lath, three-coat stucco restoration, and interior drywall repair at a single window — typically runs $2,000–$6,000.
How to assess caulk condition
Walk the perimeter of the house and examine the sealant joint at every window and door — all four sides of each frame. Look for:
- Shrinkage — the bead has pulled inward, creating a concave profile with visible gaps at the edges
- Separation — the caulk has debonded from the stucco face, the frame, or both, leaving an open gap
- Chalking — white powdery surface indicates UV degradation and loss of flexibility
- Cracking — longitudinal cracks along the bead length, especially on south and west-facing windows with maximum UV exposure
Any of these conditions means the joint is no longer functioning as a water barrier. The joint must be cleaned, old caulk fully removed, and new sealant applied to a clean, dry substrate. Applying new caulk over old, degraded caulk without removal produces a repair that lasts 12–18 months before the underlying failure causes the new bead to fail as well.
The difference in service life between a $4 latex caulk tube and a $16 silicone sealant (Pecora 864, Dow 795, or equivalent) is not incremental — it’s roughly 3–5 years versus 10–15 years in NJ conditions. For window perimeters specifically, where thermal movement is highest, the flexibility of silicone throughout its service life is the critical property. Latex caulk hardens, loses flexibility, and fails in the joints that move most. Use silicone at every window and door transition on stucco. It costs $12 more per window. It lasts three times longer.
Flashing: The Silent Killer of Long-Lived Stucco
Unlike caulk failure — which develops gradually and visibly — flashing failure is often a construction deficiency present from installation day that causes damage silently for years before any surface sign appears. A home built in the 1990s without kick-out flashing at a garage-to-house wall junction has been accumulating water damage at that location through every NJ rainstorm for 25–30 years. The stucco surface above may look fine. The sheathing behind it may be extensively compromised.
Understanding the key flashing locations tells you where to look and what to monitor. The full technical explanation is covered in our article on where stucco leaks start — the short version for lifespan purposes:
- Kick-out flashing at every point where a roof slope terminates against a vertical stucco wall — its absence is the leading cause of concentrated wall rot in NJ homes
- Head flashing above every window — redirects water running down the wall away from the window-to-stucco transition
- Sill pan flashing below every window — catches any water that enters the window perimeter and directs it outward
- Step and counter flashing at chimney-to-wall junctions — a common leak source on older NJ homes with brick chimneys
If your home was built before approximately 2000 and has not had a flashing assessment, it is worth having the key locations inspected — particularly any wall below a roof edge. Retrofitting kick-out flashing is a relatively inexpensive repair. Replacing the wall damage that accumulates over decades without it is not.
Drainage and Grade Control
Two drainage issues cause chronic, low-grade moisture stress on stucco that accumulates into real damage over a 5–10 year period:
Ground contact at the stucco base
The bottom edge of stucco must maintain a minimum 4–6 inch clearance from grade. When soil or mulch contacts the stucco base — whether from landscape settling, mulch depth increasing over years, or grading changes — the stucco acts as a moisture wick. Capillary action draws ground moisture upward into the stucco and behind it continuously, regardless of rainfall. The sheathing at the base of the wall stays chronically elevated in moisture content, accelerating rot. Inspect grade clearance annually and pull mulch back from the base of the wall each spring.
Gutters and downspout terminations
Blocked gutters overflow at the fascia and run down the stucco face at eave level — the high-concentration runoff that kick-out flashing is designed to address at roof edges becomes an unmanaged flow directly down the wall. Clean gutters in late October after leaf fall and confirm downspout extensions direct water at least 6 feet from the foundation. A downspout terminating at grade next to the wall soaks the soil against the stucco base continuously during rain events.
When to Seal or Repaint — and When Not To
Sealing and painting stucco extends its service life when applied correctly. Applied incorrectly — specifically, applied over elevated-moisture substrate — it accelerates damage by trapping moisture inside the wall assembly. The timing and preconditions matter as much as the product choice.
Penetrating sealers (silane/siloxane)
A breathable penetrating silane or siloxane sealer applied to traditional hard-coat stucco improves water repellency while maintaining vapor permeability — the stucco can still dry through the surface if moisture enters from behind. These products are most beneficial on north-facing and shaded walls with chronic moisture exposure, and on stucco that has been recently repaired. Apply every 5–8 years to clean, fully dry substrate. Never apply to stucco that has visible active cracks, elevated moisture readings, or recent repair that hasn’t fully cured.
Elastomeric paint and acrylic coatings
Elastomeric coatings provide UV protection, color refresh, and bridge minor surface cracks. They are the right choice when stucco finish is chalking, color has faded significantly, or a uniform appearance across repaired and original areas is desired. They are the wrong choice — potentially a damaging choice — when applied over stucco with elevated moisture content. Our stucco painting page covers what pre-coating substrate verification involves and when we use elastomeric vs. breathable formulations.
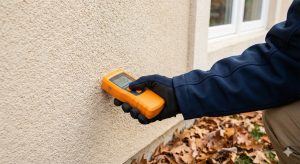
No protective coating should be applied to stucco with substrate moisture readings above 12%. This applies to both sealers and paints. If you’re planning to coat your stucco and there is any history of moisture intrusion, staining, or failed caulk, have the substrate moisture verified before the coating goes on. A moisture probe test at a few key locations costs far less than discovering you’ve sealed wet wood inside the wall.
Prompt Repairs vs. Deferred Repairs: The Math
Stucco damage is not static — it compounds over time. A failed caulk joint that’s addressed immediately costs $50–$150 to reseal. The same joint, left unaddressed for two NJ winters, has introduced water behind the stucco at a rate of gallons per storm. The repair at that point involves opening the wall, assessing and replacing sheathing, rebuilding stucco coats, and color matching — typically $2,000–$5,000 for a single window. Left another three years: possible framing involvement, mold remediation, interior drywall repair — $8,000–$20,000+.
This compounding is the central argument for the twice-yearly inspection described in our seasonal maintenance checklist. The inspection itself is free and takes 30 minutes. The repair costs it enables you to catch early vs. late are not incremental — they’re an order of magnitude different. The single most effective thing a stucco homeowner in NJ or PA can do to control lifetime maintenance costs is inspect twice a year and address caulk and visible crack findings immediately.
| Issue | Cost if addressed immediately | Cost after 2–3 years deferred | Cost after 5+ years deferred |
|---|---|---|---|
| Failed window caulk | $50–$150 | $2,000–$5,000 | $8,000–$20,000+ |
| Missing kick-out flashing | $200–$500 | $3,000–$8,000 | $10,000–$40,000+ |
| Crack wider than 1/8″ | $300–$600 | $800–$2,500 | $2,000–$8,000 |
| Grade contact at base | $0 (pull mulch back) | $500–$2,000 | $3,000–$10,000 |
For any of these situations where work is needed, our stucco repair and contractor selection guide cover how to ensure the repair is done correctly the first time.
Caulk replacement, crack repair, moisture damage, section restoration — NJ & PA
Elastomeric coatings, UV protection, color refresh — substrate verification before every application
Frequently Asked Questions
Kamil has installed and repaired stucco exteriors across New Jersey and Pennsylvania for over a decade, working with Senergy-Sika, Dryvit, and Sto materials on projects ranging from Mercer County residences to commercial work for Marriott and Hyatt and the BAPS Swaminarayan Akshardham Temple in Robbinsville, NJ.