Why Stucco Leaks: It’s Usually the Flashing, Not the Wall
A dark stain appears on your drywall after a rainstorm and you assume the stucco is to blame. In most cases, you’re looking at the wrong place entirely. Here’s where leaks actually start — and how to fix them properly.
It starts with a musty smell in a corner room. Then a small dark stain spreads across the drywall after a NJ rainstorm. The homeowner walks outside, sees hairline cracks in the stucco, and draws the obvious conclusion. Usually, that conclusion is wrong.
After repairing water-damaged stucco exteriors across New Jersey and Pennsylvania for over a decade — from Mercer County townhomes to large commercial facades — the pattern is consistent: the stucco field itself is rarely the source of a serious leak. Water gets in at the transitions, not through the wall. The culprit is almost always flashing.
This article explains exactly where leaks originate, why common “fix-it” approaches make the problem worse, and what a proper repair actually involves. If you’re currently dealing with water intrusion, this is the diagnosis you need before calling anyone. And if you’re buying a stucco home in NJ, understanding this concept will save you from an expensive post-closing surprise.
The Misconception: “Stucco Is Porous, So It Leaks”
Traditional hard-coat stucco is a cement-based material. Cement is porous — it absorbs moisture during rain and releases it as conditions dry. This is not a defect. It is how the system is engineered to work.
A correctly built stucco wall assembly includes a weather-resistant barrier (WRB) — typically 15-lb felt paper or a modern housewrap — installed directly against the sheathing, underneath the metal lath and stucco coats. If moisture penetrates the stucco surface, the WRB catches it and channels it downward and out at the base of the wall. The stucco then dries from the outside as temperature and air circulation allow.
This “reservoir cladding” design has been used for over a century. When it fails, it’s almost never because the stucco absorbed rain. It fails because water found a way past the WRB entirely — entering at a point where the system has a seam, a penetration, or an inadequate transition detail. Those points are windows, doors, and roof-to-wall junctions.
Unlike traditional stucco, older EIFS (Exterior Insulation and Finish System) “barrier” systems were designed to be waterproof on the surface — with no drainage layer behind the foam. When that surface seal failed, there was nowhere for water to go. This is why pre-2000 EIFS has a dramatically higher failure rate. See our full comparison: EIFS vs traditional stucco — which system is right for your NJ home.
What Flashing Is — and Why It Fails
Flashing is the waterproofing layer installed at every junction where the stucco meets another material or surface — windows, doors, roof edges, chimneys, deck ledgers, utility penetrations. It’s typically made from metal (galvanized steel, aluminum, or copper), rubberized asphalt tape, or a combination of both.
Its only job is to direct water outward and downward, away from the wall assembly. When it works, you never think about it. When it fails — or was never installed correctly in the first place — water finds a direct path behind the stucco, bypasses the WRB entirely, and reaches the wood framing.
Once water reaches the OSB or plywood sheathing, the timeline is straightforward: the wood swells, softens, and begins to rot. Mold follows. The structural framing behind the sheathing can be compromised within a few seasons. All while the exterior stucco surface looks largely intact.
Stucco is a concealed weather-barrier system — the damage happens behind the surface. A wall with advanced sheathing rot can look perfectly normal from the outside. This is why visual inspection alone is insufficient if you suspect a leak, and why we often need to open a small section of wall to accurately diagnose the source.
Culprit #1: Failed Window & Door Transitions
Across NJ and PA stucco repair projects, failed window and door transitions account for the majority of water intrusion cases. The reason is straightforward: vinyl windows expand and contract significantly with temperature change. Stucco does not. The movement differential is constant and relentless.
How the failure happens
Many homes — particularly those built quickly during construction booms in the 1990s and early 2000s — relied on a simple bead of caulk to seal the gap where the stucco face meets the window frame. That caulk hardens over five to ten years, loses elasticity, and begins pulling away from one or both surfaces. The gap that opens is often invisible to the naked eye.
But wind-driven rain in a NJ nor’easter enters that gap under pressure. It runs down behind the window frame, past any inadequate or missing sill flashing, and into the wall assembly. The interior drywall stain that prompted this whole conversation? It’s typically 12–24 inches below and inside from the actual entry point at the window head.
What proper repair looks like
Re-caulking the surface is not a repair — it’s a delay. A correct repair addresses the flashing integration behind the stucco:
- Remove stucco around the window perimeter to expose the frame-to-WRB junction
- Install or replace head flashing above the window (the most critical piece)
- Install or replace sill pan flashing below the window with positive drainage slope
- Integrate both flashings into the weather-resistant barrier layer
- Rebuild stucco coats and seal perimeter with high-performance flexible sealant
When I trace a leak on a NJ stucco home, I always start at the top of the window, not the bottom. The entry point is almost always the head joint — where water hits the wall at an angle in a storm and finds the gap at the top of the frame. The staining appears on the sill or on the interior wall below, which makes homeowners (and less experienced contractors) look in the wrong place entirely.
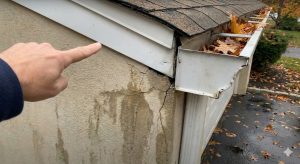
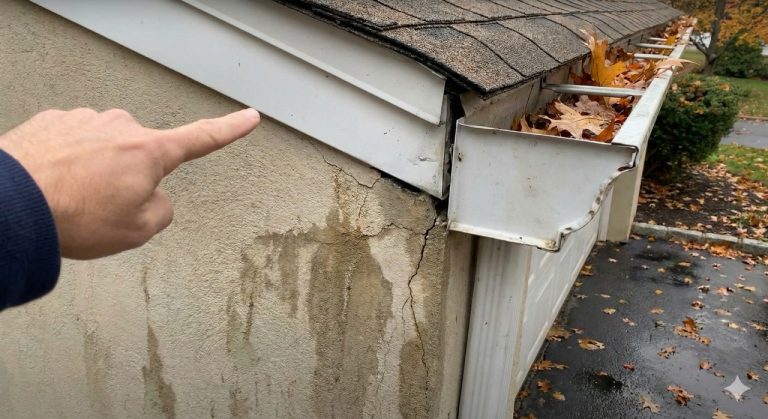
Culprit #2: The Missing Kick-Out Flashing
If the water damage is concentrated on a wall section located below a roof gutter termination — where the roof edge meets the wall — there is a very high probability that kick-out flashing was never installed or has failed.
What kick-out flashing does
Where a sloped roof meets a vertical wall, water running down the roof slope naturally wants to follow the wall downward rather than divert into the gutter. A kick-out flashing diverter is a small angled metal piece that intercepts that flow and redirects it outward into the gutter.
Without it, every rainstorm dumps a concentrated stream of roof runoff directly onto the stucco at the wall-roof junction. New Jersey averages over 46 inches of rainfall per year. That volume, concentrated at a single point, will eventually overwhelm any caulk or surface sealant. The water enters behind the stucco, runs down inside the wall cavity, and may not show up as interior damage until it has saturated several feet of framing.
Look up at every point where your roofline ends against a vertical wall — typically where a garage roof meets the house wall, or where a dormer meets the main facade. You should see a small metal piece angled outward toward the gutter. If the roof edge simply terminates flush with the wall with nothing redirecting the water, assume that area has sustained some degree of moisture exposure and have it assessed before the next heavy rain season.
The cost gap that makes this infuriating
Kick-out flashing costs approximately $20 in materials and takes under an hour to install correctly during original construction. Retrofitting it after the fact — opening the wall, removing damaged sheathing, treating any mold, replacing framing members if necessary, reinstalling lath, rebuilding stucco coats, and color matching — typically runs $3,000–$15,000 depending on how long the damage went unaddressed. This is the repair that every stucco contractor in NJ has done dozens of times, and it’s almost always 100% preventable. Our stucco repair page covers the full scope of what this kind of corrective work involves.
Why the “Band-Aid” Fix Makes Things Worse
When a homeowner reports a stucco leak, a common contractor response is to apply a thick coat of elastomeric paint over the facade and run a fresh bead of caulk around every window. On the surface — literally — this looks like a repair. The hairline cracks disappear. The old caulk is covered.
This approach has two serious problems:
Problem 1: It doesn’t address the entry point
Elastomeric paint bridges hairline surface cracks. But as we’ve established, hairline surface cracks are almost never the primary water entry point. The water is entering at the flashing failure — which elastomeric paint does not reach. The leak continues. You just paid for a cosmetic improvement on top of an ongoing problem.
Problem 2: It can trap existing moisture
Traditional hard-coat stucco is a breathable system — moisture that enters can also exit through the surface as vapor. Applying a thick, low-permeability coating over a wall that already has elevated moisture content traps that moisture inside. The wood drying cycle is broken. What was a slowly drying, manageable moisture situation becomes an accelerating rot problem with nowhere to breathe.
If a contractor’s proposed fix for a stucco leak is exclusively elastomeric paint application and perimeter re-caulking — with no mention of opening the wall to verify flashing conditions or sheathing integrity — ask them specifically how they’ve identified the water entry point. If they can’t give a specific answer, the fix they’re proposing is cosmetic.
JARART LLC’s Diagnostic Repair Process
Proper stucco leak repair is a sequence of steps, not a single product application. Here is how we approach water intrusion jobs across NJ and PA:
Step 1 — Source identification: We trace the leak path back to the failed transition point. Interior staining tells us where water is arriving; we work backward to find where it entered — typically a window head, kick-out junction, or chimney transition.
- Source identification — trace the leak path to the actual entry point, not the visible symptom
- Targeted opening — remove the minimum stucco section needed to expose the failed flashing and assess sheathing condition
- Sheathing assessment — probe moisture readings, document damaged area, replace any soft or rotted OSB/plywood
- Corrective flashing installation — install proper metal or tape flashing integrated into the WRB layer — the detail that should have been there originally
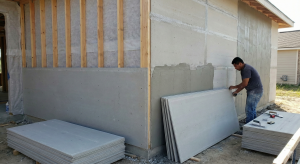
- Stucco system rebuild — weather-resistant barrier, metal lath, scratch coat, brown coat, finish coat in the correct sequence
- Color and texture matching — blend repaired section with existing facade; for larger repairs, optional full-wall elastomeric finish for uniform appearance
- Perimeter sealing — high-performance flexible silicone (Pecora or Dow) at all window and door transitions — the same products used on the BAPS Akshardham Temple project in Robbinsville, NJ
The result is a repair where no one can tell we were there — and more importantly, one where the water has nowhere to re-enter. For a full overview of our repair capabilities including EIFS reconstruction, kick-out flashing retrofits, and bird damage repairs, see our stucco repair services page.
Flashing installation, window sealing, sheathing replacement, full section restoration — NJ & PA
Traditional hard-coat, drainage-plane EIFS, and cement board systems installed correctly from day one
Frequently Asked Questions
Originally from Poland, Kamil has spent over a decade mastering stucco installation and repair across New Jersey and Pennsylvania. His projects range from Mercer County residential repairs to landmark commercial work including the BAPS Swaminarayan Akshardham Temple in Robbinsville, NJ — the largest Hindu temple in the USA — where JARART LLC performed acrylic stucco, Venetian stucco, waterproofing, silicone sealing, and color matching.