Why Stucco Leaks: Kickout Flashing and the Details That Actually Fail
Stucco walls almost never leak through the stucco. They leak at the transitions — and one missing piece of metal at the roofline causes more hidden damage in New Jersey and Pennsylvania homes than any other single defect.
When water gets behind stucco, the entry point is a transition: a roof-to-wall junction with no kickout flashing, a window head without proper flashing above it, or a penetration whose sealant has aged out. The stucco field itself is rarely the problem. This matters because sealing or repainting the wall — the most common response — does nothing about any of those.
Stucco Is Not Waterproof, and Was Never Meant to Be
Cement-based stucco is porous. It absorbs water during rain, holds it, and releases it as the wall dries. Building scientists call this a reservoir cladding. The stucco is not the waterproofing layer — it is the outer layer of a system in which something else does that job.
That something else is the weather-resistant barrier behind the lath, together with the flashing at every point where the wall is interrupted. A stucco wall works in three stages: the stucco sheds most water and absorbs some, the barrier stops what gets past it, and flashing routes that water back out before it reaches the sheathing.
So “stucco is porous, that’s why it leaks” is a half-truth that leads directly to the wrong fix. Porosity is by design. Leaks happen where the drainage path is broken.
What Kickout Flashing Is and Why Missing It Causes So Much Damage
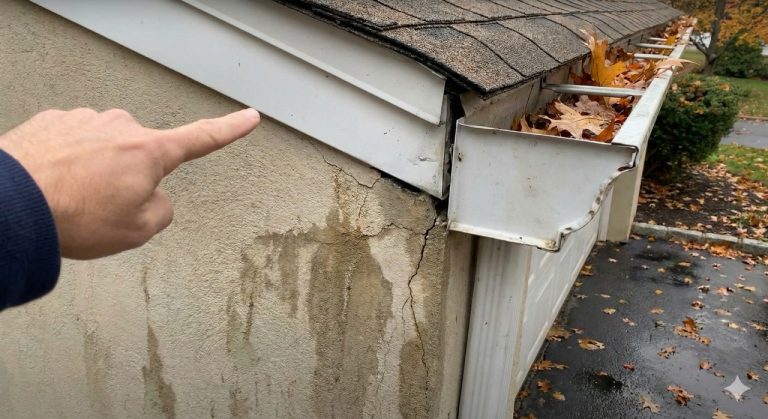
Kickout flashing — also called kickout diverter flashing — is a small piece of angled metal installed where the bottom edge of a sloped roof meets a wall that continues past it. Its job is to divert water running down the roof-wall junction away from the wall and into the gutter, instead of letting it run straight down behind the cladding. Kickout flashing on a stucco wall matters more than on lapped siding, because stucco conceals the consequences for longer.
It is a component measured in inches, and its absence is responsible for a disproportionate share of the serious moisture damage we see.
The mechanism is worth understanding, because it explains the severity. A roof surface collects a large volume of water. All of it funnels down the junction where the roof edge meets the sidewall. Without a kickout at the bottom of that run, that concentrated stream arrives at the wall and goes behind the cladding at one spot. It is not incidental moisture — it is roof drainage, aimed at a single point in your wall, every time it rains.
Water entering at a kickout location travels down inside the assembly. By the time anything appears on an interior wall or ceiling, it has usually been running for years and the sheathing in that area is well past the point of surface repair. A wall with advanced rot behind it can look completely normal from the street — which is why visual inspection alone is insufficient where a kickout is missing.
You can check for this yourself from the ground. Find every place on the house where a roof edge terminates against a wall that carries on past it — commonly at a garage projection, a dormer, or a bay. There should be a small flared piece of metal at the bottom of that junction — the kickout flashing gutter connection — directing water outward rather than down the wall. If the step flashing simply stops at the wall with nothing turning it out, that’s the defect.
Is Kickout Flashing Required by Code?
Yes, and it has been for a long time — which matters if you are dealing with a builder, an inspector, or a dispute.
IRC Section R905.2.8.3 covers sidewall flashing. It requires base or step flashing against a vertical sidewall to be not less than 4 inches in height and 4 inches in width, and to direct water away from the sidewall onto the roof or into the gutter. The 2009 edition made the requirement explicit: at the end of the vertical sidewall, the step flashing is to be turned out so it directs water away from the wall. From 2015, IRC R903.2.1 states directly that flashing is required at wall and roof intersections and to divert water away from where the eave of a sloped roof intersects a vertical sidewall.
Two practical caveats. Codes are adopted and amended locally, so what applies to your property depends on your jurisdiction and the edition in force when the house was built or last permitted. And requirements for existing buildings — for instance whether a kickout must be added during re-roofing or re-siding — vary between states. Your local building department is the authority on both.
On any stucco house with a water complaint, I look up at the rooflines before I look at a single crack. Where does a roof edge die into a wall? Is there metal turning the water out there, or does the step flashing just stop? That one check explains a large share of the leaks I get called to. The crack the homeowner is worried about is usually somewhere else entirely, and usually not the cause.
The Other Transitions That Fail
Kickouts are the most consequential, but they are not the only place a stucco wall gets breached.
- Window and door heads. The transition above an opening needs flashing that laps correctly over the barrier below it. Where head flashing is missing or was installed out of sequence, water running down the wall enters at the top of the frame. The classic symptom is dark vertical streaking below window corners — sometimes called stucco tears.
- Perimeter sealant at openings. Sealant is a consumable. It hardens, shrinks and separates from one side of the joint, typically within a decade. Once it has, the joint is open.
- Penetrations. Hose bibs, electrical outlets, dryer vents, light fixtures, deck ledgers — each is a hole through the barrier, and each needs sealing and, where appropriate, flashing.
- Stucco carried below grade. Where the base of the wall disappears into soil or mulch, it wicks moisture continuously from below, and no amount of surface work stops that.
Why Sealing and Repainting Doesn’t Stop a Leak
This is the most common response to a stucco leak and the most consistently ineffective.
Applying an elastomeric coating or a waterproofing sealer to the wall addresses the field of the stucco — the part that was not the problem. Water entering at a kickout location or a window head bypasses the field entirely. Meanwhile a low-permeability coating restricts the wall’s ability to dry outward, which on a wall that already has moisture in it makes the situation worse, not better.
The same applies to re-caulking the perimeter as a standalone measure. If the sealant genuinely was the entry point, that helps. If water is arriving from a roof junction above, fresh caulk at the window changes nothing except how long it takes to notice.
If a proposed fix for a stucco leak consists only of coating and re-caulking, with no mention of verifying flashing conditions or checking sheathing, ask them specifically how they identified where the water is entering. A specific answer — a roof junction, a particular window head — means they have diagnosed it. No specific answer means the proposal is cosmetic, whatever it costs.
How the Source Actually Gets Found
Stucco leak detection follows the water backwards, and it goes in a fairly reliable order. Any stucco leak repair worth paying for starts here rather than with materials:
- Map the interior evidence. Where exactly is the staining, and on which elevation? Interior damage appears below and often to one side of the actual entry point, not directly behind it.
- Survey the exterior above that point. Working upward from the evidence: penetrations, window and door heads, then rooflines. The entry is almost always higher than the symptom.
- Check every roof-to-wall termination on that elevation for a kickout. This is where a large share of investigations end.
- Moisture testing. Probe readings in the sheathing establish where moisture actually is and how far it extends — screening tools indicate, probes confirm. What a stucco inspection involves is covered here.
- Open a small section where the evidence points. On a concealed system, at some stage you have to look. This is how the extent of sheathing damage is established, and it determines whether you are looking at a repair or at remediation.
In New Jersey and eastern Pennsylvania this sequence matters more than it would elsewhere. Roughly 90 to 110 freeze-thaw cycles a year and over 45 inches of annual rainfall — much of it wind-driven during nor’easters — mean a defective transition here is tested harder and more often than the same detail in a milder climate.
Frequently Asked Questions
Originally from Poland, Kamil spent years mastering stucco and exterior finishing before founding JARART LLC in New Jersey. Over a decade of NJ and PA projects — from Mercer County residences to commercial work for Marriott and Hyatt and the BAPS Swaminarayan Akshardham Temple in Robbinsville, NJ, the largest Hindu temple in the USA. JARART LLC works with Senergy-Sika, Dryvit, Sto, Sherwin-Williams, Behr, Pecora and Benjamin Moore materials.