Stucco Removal & Remediation: A Contractor’s Honest Guide
“Do I need to remove my stucco?” is one of the most expensive questions a homeowner can get wrong in either direction. This guide gives you the framework to answer it correctly — before you commit to a scope of work.
- Repair vs. remediation vs. full removal — the critical distinction
- What causes stucco to fail in the first place
- When does stucco actually need to come off?
- Asbestos: what every pre-1980 homeowner must do first
- The remediation process step by step
- What drives the cost of stucco removal
- DIY removal — the honest assessment
- Frequently asked questions
Most homeowners who ask about stucco removal don’t actually need it. Most homeowners who avoid asking about it do. The problem is that stucco damage is hidden — and the decision about how much needs to come off requires understanding what’s happening behind the surface, not just what’s visible on it.
JARART LLC performs stucco repair and full remediation across New Jersey and Pennsylvania. We’re stucco specialists — not a company that removes stucco and replaces it with vinyl siding. That distinction shapes how we approach every project: we start by determining whether removal is genuinely necessary, because unnecessary full removal is an expensive mistake, and inadequate repair on a wall that needs remediation is an expensive delay.
Repair vs. Remediation vs. Full Removal: The Critical Distinction
These three terms describe fundamentally different scopes of work. Using them interchangeably — as homeowners and contractors often do — creates confusion about what problem is actually being solved and what the work should cost.
Stucco repair
Surface-level intervention: cracks filled, caulk replaced, small damaged sections patched and finished. No wall is opened, no sheathing accessed. Appropriate when damage is confirmed to be cosmetic — no active water intrusion, no elevated substrate moisture, no delamination. The critical qualifier: repair is only the correct scope when the water entry source has been identified and eliminated. Repairing the surface of a wall with active moisture intrusion is not a repair — it’s a delay that makes eventual remediation more expensive.
Stucco remediation
Full system removal and reconstruction. The existing stucco is stripped — selectively in targeted areas, or entirely on affected facades — to expose the sheathing. The substrate is assessed, damaged wood replaced, mold remediated if present, and the wall rebuilt correctly from the WRB outward: new weather-resistant barrier, new flashing at all transitions, new lath, new stucco system. Stucco in, stucco out. This is the correct scope when moisture readings behind the wall are elevated, when flashing is systemically incorrect and cannot be retrofitted without opening the wall, or when stucco has delaminated over a significant area.
Full stucco removal (replacing with different siding)
Stucco removed entirely and replaced with a different cladding system — vinyl, fiber cement, or another material. Relevant when the homeowner wants to change material type, or when remediation cost approaches the cost of full replacement with a preferred alternative. JARART LLC focuses on stucco-to-stucco remediation rather than material conversion — if you’re evaluating a siding change, that’s a different contractor’s scope.
| Scope | Wall opened? | Substrate accessed? | When appropriate |
|---|---|---|---|
| Repair | No | No | Cosmetic damage, dry substrate confirmed, water source eliminated |
| Selective remediation | Targeted areas only | At problem locations | Localized moisture damage, concentrated flashing failure |
| Full facade remediation | Yes — full facade | Entire wall | Systemic moisture damage, failed EIFS, whole-wall delamination |
| Full removal (new siding) | Yes | Yes | Material change, structural re-evaluation |
What Causes Stucco to Fail in the First Place
Understanding why stucco fails helps explain why removal is sometimes the only correct path — and why it’s often avoidable with earlier intervention.
Installation deficiencies
The most consequential failure mode — and the one most likely to eventually require remediation rather than repair. Missing or incorrectly installed flashing at windows, doors, and roof-to-wall junctions creates water entry points that are present from day one. Incorrect mixing proportions, insufficient cure time between coats, or application over a WRB that was torn or incorrectly lapped during installation set up long-term problems that eventually require wall access to correct. For a full breakdown of how installation failures become leak problems: where stucco problems actually start.
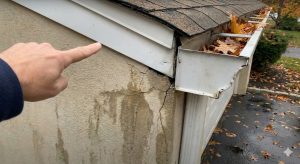
Deferred maintenance
Failed perimeter caulk at windows is the most common preventable cause of stucco damage that escalates to remediation territory. A gap in window sealant introduces water behind the stucco during every rain event. Left unaddressed for a few NJ winters, the wood sheathing behind that window becomes chronically elevated in moisture — eventually soft, then rotted. The escalation from “needs re-caulking” to “needs sheathing replacement” typically takes 3–5 years. Caught at the caulk stage, it’s straightforward maintenance. Caught at the sheathing stage, it’s a remediation project.
Environmental stress
NJ and PA’s climate is among the most demanding for stucco in the country: 47+ inches of annual rainfall, 90–110 freeze-thaw cycles per year, nor’easters that drive wind-driven rain into wall transitions at significant pressure. This environment doesn’t cause correctly installed stucco to fail — but it finds every weakness quickly. A flashing detail that would last decades in a dry climate fails in a few wet NJ winters.
Age and EIFS system type
Pre-2000 EIFS “barrier systems” — installed without a drainage plane — have a well-documented high failure rate in the NJ/PA market. These systems had no exit path for any moisture that entered. After 20–30 years, many are at or past their functional lifespan regardless of maintenance. This is the category most likely to require full facade remediation rather than repair. See our full comparison: EIFS vs traditional stucco.
When Does Stucco Actually Need to Come Off?
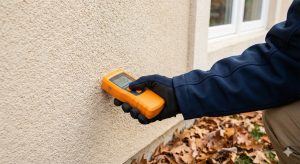
The decision to open a wall is driven by substrate condition. A stucco inspection with invasive probe testing gives you the moisture readings that answer this question objectively rather than by guesswork.
Indicators that remediation is likely necessary
- Substrate moisture above 20% at multiple probe locations — wood at this level is actively at risk; surface repair alone won’t reverse it
- Soft or spongy substrate when probed — wood that accepts the probe tip easily has lost structural integrity and must be replaced
- Stucco delamination over significant area — sections that sound hollow when tapped and have separated from the substrate cannot be reattached; they must be removed and rebuilt
- Active mold behind the wall confirmed by inspection — mold cannot be remediated through the stucco surface
- Systemic flashing deficiency — when kick-out and head flashing is absent from multiple locations, retrofitting without full wall access is insufficient
- Failed barrier EIFS (pre-2000 installation) with elevated moisture at multiple locations — these systems typically warrant full facade remediation given the extent of potential hidden damage
Indicators that targeted repair is likely sufficient
- Substrate moisture below 12% at all probe locations — the wood is dry, damage is confined to the stucco surface
- Damage is isolated to specific, identifiable locations with a clearly correctable water entry source
- Stucco is well-adhered — no hollow sections on tap test — and damage is surface cracking or localized impact
- Recent installation with no documented water intrusion history
Before we open any wall, I want to know: where did the water enter, and can we address that entry point without full wall access? If we can identify a specific failed kick-out or a missing head flashing above a single window and retrofit it while opening only the necessary section — that’s targeted remediation, not full removal. If moisture readings suggest the entire wall has been wet for years and flashing failures are systemic, full facade remediation is the honest answer even if it costs more. Opening one section, fixing it, and leaving the rest wet is not remediation — it’s a partial fix that extends the problem’s timeline.
Asbestos: What Every Pre-1980 NJ & PA Homeowner Must Do First
If your home was built or last re-stuccoed after approximately 1980, asbestos in stucco is not a concern. If your home predates 1980, this section applies to you before any removal activity begins.
Asbestos was commonly added to stucco and plaster mixes through the 1970s for durability and fire resistance. Intact, well-adhered stucco that contains asbestos is generally not an immediate hazard. During removal, however, breaking apart the stucco releases fibers into the air, creating an inhalation risk with serious long-term health consequences.
Required steps for pre-1980 homes in NJ
- Test before touching: a licensed asbestos inspector takes small samples for laboratory analysis before any demolition activity. This is required by NJ DEP regulations before removal that disturbs suspect material beyond regulatory minimums — it is not optional.
- If asbestos is confirmed: removal must be performed by a NJ DEP-licensed asbestos abatement contractor using prescribed containment, PPE, and disposal protocols. Standard stucco contractors — including JARART LLC — are not licensed abatement contractors; this requires a separate specialist before stucco remediation can proceed.
- If asbestos is not confirmed: removal proceeds normally under standard safety protocols.
- Disposal: asbestos-containing material cannot go into standard construction waste — it requires transport to a licensed facility under chain-of-custody documentation.
New Jersey has specific asbestos regulations administered by the NJ Department of Environmental Protection. For residential renovations that disturb suspect asbestos-containing material, NJ requires notification and use of certified abatement contractors when applicable thresholds are exceeded. Violations carry significant fines. For any pre-1980 NJ or PA home, testing before any stucco removal is a legal requirement when the stucco tests positive — not a precaution.
The Remediation Process Step by Step
Full stucco remediation — whether selective or full-facade — follows a consistent sequence. The steps that happen before new stucco is applied are where the quality of the remediation is determined.
Step 1 — Inspection and written scope
A thorough inspection establishes the extent of damage before any material is removed. Probe testing documents moisture levels at key locations. The result is a written scope that specifies which sections will be removed, what substrate damage is anticipated, and what flashing corrections are required. This document drives the contract, the timeline, and the contingency budget.
Step 2 — Site protection and preparation
Windows, landscaping, driveways, and adjacent surfaces are protected with masking film and drop cloths. Scaffolding is set for multi-story work. Permits are confirmed with the local municipality — NJ typically requires a building permit for exterior cladding removal when structural elements are involved.
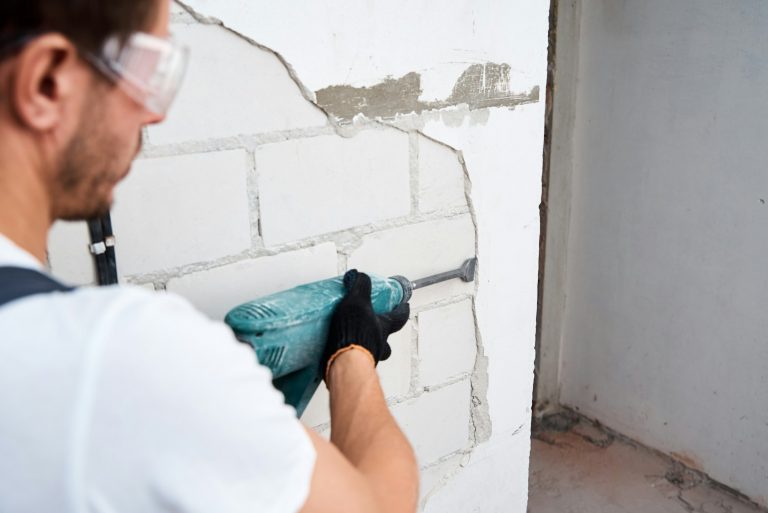
Step 3 — Stucco removal
Traditional hard-coat stucco is removed mechanically — cold chisel and hammer for smaller areas, rotary hammer for larger sections. The goal is clean removal without damaging the WRB behind the lath. EIFS foam is cut and pried away from the adhesive. All removed material — stucco, lath, nails, adhesive residue — is cleaned from the sheathing surface before assessment begins. Debris is collected and disposed of as construction waste; if asbestos is present, disposal follows licensed facility requirements.
Step 4 — Substrate assessment and repair
With the wall open, actual substrate condition is assessed. This step sometimes reveals more — or occasionally less — damage than pre-removal probe testing suggested, which is why every remediation contract should carry a contingency budget. Soft, discolored, or structurally compromised OSB or plywood sheathing is replaced with code-compliant material. Any mold found requires separate remediation before the wall is closed. Framing members are assessed and repaired if damaged.
Every remediation contract should include a contingency allowance — typically 15–20% of the base scope — for substrate damage discovered when the wall is opened. Pre-removal probe testing gives a strong indication, but the full picture isn’t visible until the stucco comes off. I’ve opened walls expecting to replace two sheets of OSB and found six. I’ve also opened walls expecting extensive sheathing replacement and found the wood dry and sound. Any contractor who guarantees a final cost before the wall is open hasn’t done enough of this work to know what they’ll find.
Step 5 — Window and door assessment
With wall access, windows and doors are assessed for flashing condition. In most NJ and PA remediation projects, windows are temporarily removed to allow correct head flashing and sill pan installation integrated into the new WRB. Attempting to detail windows through the finish coat without wall access produces the same inadequate flashing that caused the original problem.
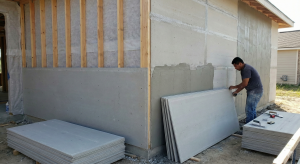
Step 6 — Correct wall assembly installation
- New WRB applied over repaired sheathing — correctly lapped, all seams taped, no gaps at penetrations
- Flashing integration — head flashing above every window, sill pans below, kick-out flashing at every roof-to-wall junction, all integrated into the WRB layer. This is where the previous system failed; it must be correct in the new installation
- Metal lath — self-furring galvanized lath fastened correctly into studs
- Three-coat stucco system — scratch coat, brown coat with correct cure intervals, finish coat matched to existing texture and color
- Perimeter sealing — high-performance silicone at all window and door transitions after finish coat has cured
Step 7 — Color and texture matching
Where remediated sections adjoin existing stucco, color and texture matching is required. New stucco will be lighter than weathered material and blends progressively over months. For full facade remediation, the entire facade receives new finish — straightforward and uniform. JARART LLC uses Senergy-Sika, Dryvit, and Sto materials with factory color matching.
What Drives the Cost of Stucco Removal and Remediation
Stucco removal and remediation pricing varies significantly from project to project. Rather than quoting a number that may not reflect your specific situation, we think it’s more useful to explain the factors that drive cost — because understanding them helps you evaluate any estimate you receive.
Size and scope of removal area
More square footage means more labor hours, more material for the new system, and more debris to dispose of. A single-window targeted repair is a fundamentally different scope from full facade remediation on a 2,500 sq ft home. The scope can only be accurately determined after inspection — which is why we always start there.
Substrate damage discovered on opening
This is the most significant variable in remediation cost. A wall with dry, sound sheathing behind the stucco costs considerably less to remediate than one requiring extensive OSB replacement, framing repair, or mold remediation. Pre-removal probe testing gives a reasonable indication, but the actual extent isn’t confirmed until the wall is open — hence the contingency budget discussed above.
Site accessibility
Single-story work accessible from ladders is considerably less expensive than multi-story facades requiring scaffolding. Complex architectural features — dormers, bay windows, decorative trim, curved elements — require more labor time and care than straight wall runs. Properties with limited access (tight lots, mature plantings) add setup time.
Asbestos abatement (if applicable)
For pre-1980 homes where testing confirms asbestos, abatement is a separate scope performed by a licensed NJ DEP contractor before remediation begins. This adds to project cost and timeline in a way that is independent of the stucco scope itself.
System being installed after removal
The cost of new stucco installation after removal depends on which system is chosen — traditional hard-coat, drainage-plane EIFS, or cement board stucco — and the material specifications involved. See our stucco installation page for system comparisons.
Permits and disposal
Municipal permit fees vary by NJ and PA town. Debris disposal for stucco — a heavy material — carries construction waste hauling costs that scale with volume. These are real project costs that should appear in any written estimate.
Because remediation cost depends so heavily on what’s found when the wall is opened, any estimate provided without at least a visual assessment — and ideally probe testing — is a rough guess rather than a reliable number. JARART LLC provides free on-site consultations and written estimates based on actual inspection findings. Call (609) 375-7155 to schedule.
DIY Stucco Removal: The Honest Assessment
Stucco removal is physically demanding work that a capable homeowner can technically perform on a small scale. The more relevant question is whether DIY removal sets up the subsequent work correctly.
Where DIY can work
- Small, clearly defined areas on single-story construction where scaffold is not required
- Home built after 1980 with no asbestos concern
- Proper PPE available: P100 respirator, safety glasses, gloves, disposable coveralls
- Clear weather window available to close the wall promptly after opening
Where DIY creates problems
- Damage to the WRB during removal — the most common mistake. Aggressive chiseling tears the felt paper or housewrap behind the lath. Every tear must be patched before new stucco is applied, and DIY removers often don’t realize the damage they’ve done.
- Asbestos exposure on pre-1980 homes — testing must precede any removal regardless of who performs the work
- Substrate assessment requires field experience — knowing whether slightly discolored OSB is structurally compromised or just surface-stained takes experience to evaluate correctly
- Disposal logistics — stucco debris is heavy and subject to construction waste disposal requirements; this is not dumpster material without weight management
- Weather exposure risk — the open wall must be closed promptly; DIY removal without a clear plan for closing the wall quickly creates new moisture risk on top of the existing problem
If you’re considering DIY removal before hiring a contractor for the rebuild, discuss this with your contractor before starting. Some contractors will take on projects where the homeowner has removed stucco; others won’t, due to uncertainty about WRB and substrate condition. Get that conversation on record before doing work a contractor may decline to build on.
From targeted repairs to full facade remediation — written scope and estimate · NJ & PA
All three systems — correct installation from the WRB out · Mercer County, NJ & Bucks County, PA
Frequently Asked Questions
Kamil has performed stucco repair, targeted remediation, and full facade remediation across New Jersey and Pennsylvania for over a decade. Projects range from Mercer County residential repairs to commercial work for Marriott and Hyatt and the BAPS Swaminarayan Akshardham Temple in Robbinsville, NJ. JARART LLC uses Senergy-Sika, Dryvit, and Sto materials on all installation and remediation work.