How to Repair Stucco Cracks and Holes: A Contractor’s Guide
Not every stucco crack needs a contractor — and not every crack is safe to DIY. This guide draws a clear line between the two, covers correct repair technique for each scenario, and explains what distinguishes a lasting fix from one that fails within a year.
Stucco cracks are a normal part of owning a cement-based exterior in the Northeast — NJ’s 100+ annual freeze-thaw cycles guarantee some surface movement over time. The question isn’t whether cracks will appear; it’s whether a given crack is cosmetic or a symptom of something that needs professional diagnosis.
After 10+ years repairing stucco across New Jersey and Pennsylvania, the pattern is consistent: homeowners either over-react to hairline cracks that need nothing more than a caulk bead, or they under-react to wider cracks near windows that are actively letting water behind the wall. This guide helps you tell the difference before spending money or making the problem worse. For background on where stucco water damage actually starts, that article covers the moisture mechanics in detail.
Identifying the Type and Cause of Damage
Before picking up a trowel, spend five minutes understanding what you’re looking at. The repair technique depends entirely on crack type — and the wrong approach on the wrong crack creates a worse problem than leaving it alone.
Hairline cracks (under 1/16″)
These are the most common finding on traditional hard-coat stucco in NJ and PA. They result from the normal thermal expansion and contraction cycle of a rigid cement matrix across seasons. They’re cosmetic. Water does not flow through hairline cracks under normal rain conditions — surface tension keeps them sealed. They do not require structural repair, only cosmetic attention if appearance is a concern.
Exception: hairline cracks directly at window or door perimeters, where the stucco meets the frame, should be addressed with flexible sealant even at small widths — the frame moves independently from the stucco and the joint opens during temperature swings.
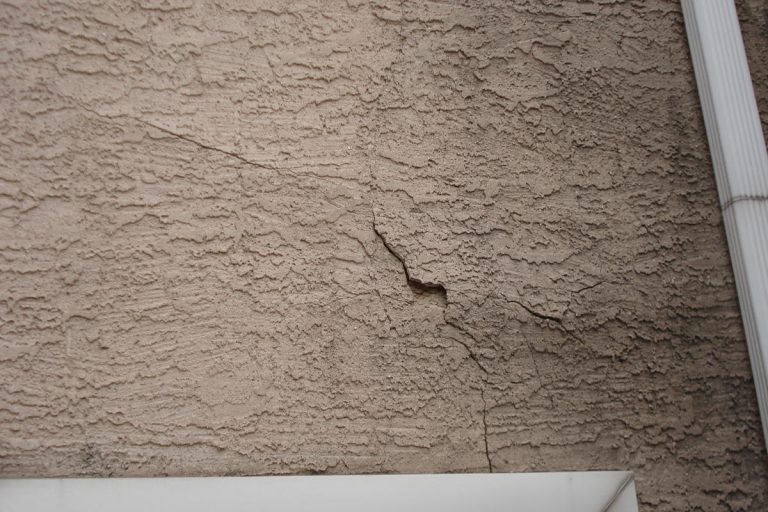
Wider cracks (1/16″–1/2″)
These require attention. At this width, wind-driven rain — especially in NJ nor’easters — can be driven into the crack under pressure. The more important question is the crack’s location and orientation:
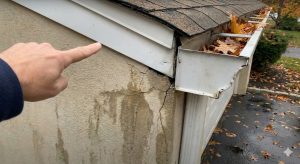
- Diagonal cracks at window or door corners — often indicate differential movement between the frame rough opening and the surrounding wall assembly. Usually repairable, but inspect the head flashing situation before patching the surface.
- Horizontal cracks at mid-wall — can indicate water saturation of the substrate causing the stucco to delaminate. Tap the wall above and below the crack; a hollow sound indicates the stucco has separated from the substrate behind it.
- Step cracks following mortar joints (on masonry substrates) — typically indicate differential settlement. These need monitoring before repair to confirm movement has stopped.
- Vertical cracks at control joint locations — normal if they coincide with a designed expansion joint. Abnormal if they appear in the field without a joint.
Holes and missing sections
Impact damage, woodpecker activity, failed sections that have delaminated and fallen away, or repair attempts that made the problem larger. These require the full multi-coat repair sequence described below, and are generally not DIY territory unless the area is small (under 6 sq inches) and the substrate behind is confirmed dry and sound.
The most expensive mistake in stucco repair is applying new material over a wet or degraded substrate. Push a screwdriver firmly against the sheathing through any opening you have access to. Sound OSB or plywood resists the tip. Soft, spongy, or easily penetrated wood means the substrate is compromised — patching the surface accomplishes nothing if the wall behind it is rotting. This situation needs professional assessment before any repair is applied.
DIY vs Professional: The Honest Breakdown
| Situation | DIY appropriate? | Notes |
|---|---|---|
| Hairline cracks in field (not at windows) | Yes | Elastomeric caulk or leave alone |
| Failed caulk at window/door perimeters | Yes | Use silicone, not latex. Correct prep is critical. |
| Cracks 1/16″–1/4″, no staining, dry substrate | Yes, with care | Requires correct prep and color match attempt |
| Cracks with dark staining below or interior damp spots | No | Active moisture intrusion — diagnose source first |
| Hollow-sounding areas (stucco delamination) | No | Section removal and full repair required |
| Holes or missing sections over 6 sq inches | No | Multi-coat repair; substrate assessment needed |
| Any crack in EIFS (foam-based stucco) | No | EIFS requires system-specific materials and technique |
| Diagonal cracks at window corners wider than 1/4″ | No | Possible foundation movement — needs assessment |
Repairing Hairline Cracks
For cosmetic treatment of hairline cracks in the field of traditional hard-coat stucco:
- Clean the crack with a stiff brush — remove all loose material, dirt, and any paint that is peeling at the crack edges
- Allow the surface to dry completely — do not repair in damp conditions or when rain is forecast within 24 hours
- Apply a paintable elastomeric caulk in a color as close to the finish coat as possible, or use a pre-mixed stucco patch product with a similar aggregate texture
- Tool the caulk into the crack and smooth flush with the surface; excess at the surface creates a visible ridge once painted
- Allow to cure per manufacturer specification before painting or sealing
If a homeowner asks me whether hairline field cracks need repair, my honest answer is usually: if you’re not planning to paint the wall anyway, don’t touch them. A patched hairline crack almost always looks more obvious than the crack itself — the patch sits slightly proud of the surface, absorbs paint differently, and draws the eye. If the goal is appearance, the most seamless outcome for hairline cracks is to leave them and repaint the entire wall surface with an elastomeric coating. That bridges the cracks uniformly and produces a finish that looks intentional.
Repairing Wider Cracks (1/8″–1/2″)
Cracks in this range require a proper repair sequence, not just surface caulk. The goal is to fill the crack through its full depth, reinforce the repair against future movement, and produce a surface that matches the surrounding texture.
Tools and materials needed
- Cold chisel and hammer, or oscillating tool — to widen the crack into a “V” profile
- Wire brush and shop vacuum — surface prep
- Alkali-resistant fiberglass mesh tape — 2″ width minimum
- Pre-mixed stucco repair compound or site-mixed Portland cement patch (1 part cement : 2.5 parts clean sand : water to workable consistency)
- Finish coat material matched to existing texture — acrylic finish from the same manufacturer if known
- Masonry brush and spray bottle for misting
Repair sequence
- Open and clean: Use a cold chisel to widen the crack to a V-profile — wider at the face, tapering inward. This gives the patch material mechanical purchase against the crack walls. Vacuum out all loose material; brush clean with a wire brush.
- Wet the substrate: Mist the cleaned crack with water. Applying stucco patch to a dry, porous substrate pulls water out of the mix before it cures, weakening the bond. The surface should be damp but not saturated — no standing water.
- Apply base fill: Pack the patch compound into the crack in the first layer, leaving the surface approximately 1/4″ below flush. Score the surface with a notched tool or nail to create a mechanical key for the next coat.
- Embed mesh: While the base fill is still workable, embed a strip of fiberglass mesh tape centered over the crack. Press firmly so it’s fully embedded in the base coat material.
- Brown coat: After the base fill has set (minimum 24 hours, longer in cool conditions), apply a second layer to bring the repair to near-flush. Feather the edges 3–4 inches onto the surrounding wall surface to avoid a visible step.
- Finish coat: Once the brown coat has cured, apply finish coat matched to the existing texture. This is the hardest step — see the color matching section below.
Stucco repair requires air and surface temperatures above 40°F throughout the curing period. In NJ, this means repair work done in October needs to be completed and cured before consistent overnight freezes begin. A repair that freezes before curing will delaminate, spall, or crack at the patch boundary within one freeze-thaw cycle. If you’re doing fall repairs, check the 10-day forecast before starting.
Repairing Holes and Section Damage
Holes larger than approximately 6 square inches require rebuilding the stucco system from the substrate out — not just filling the void. This is the repair type that most often crosses the line into professional territory, particularly when the substrate condition is unknown.
Assess the substrate first
Before any other step, verify the OSB or plywood sheathing behind the hole is sound. If it’s soft, discolored, or smells of mildew, stop — substrate replacement is required before stucco can be rebuilt. Patching stucco over compromised sheathing produces a repair that will fail again within one NJ winter, and you’ll have paid for work twice. A professional stucco inspection with probe testing establishes moisture levels in the surrounding wall before any repair is committed to.
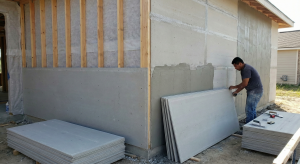
Full repair sequence for holes
- Remove loose and damaged material: Cut clean edges around the damaged area — a ragged perimeter creates poor bond conditions. All existing stucco within the repair zone should be sound and well-adhered.
- Install weather-resistant barrier: If the WRB (felt paper or housewrap) behind the lath is torn or absent in the repair area, patch it before proceeding. This is the layer that stops moisture from reaching the sheathing.
- Install metal lath: Cut and fasten a piece of self-furring metal lath to cover the hole, overlapping onto sound surrounding stucco by at least 2 inches. Fasten to studs where possible using corrosion-resistant screws.
- Scratch coat: Apply the first stucco coat over the lath, pressing firmly to ensure full embedment of the lath. Score the surface horizontally before it sets to create a mechanical key for the brown coat.
- Brown coat: After scratch coat has cured (minimum 48 hours), apply the leveling coat to bring the repair flush with the surrounding wall surface. Feather edges wide onto the surrounding stucco.
- Finish coat: Apply matching finish coat after brown coat has cured. See color matching section below.
The Hardest Part: Color and Texture Matching
Technique can be learned from a guide. Color and texture matching is the part of stucco repair that separates contractors who do this every day from everyone else — and it’s the reason why even technically correct DIY repairs often remain visible for years.
Why matching is difficult
Existing stucco has years of UV exposure, weathering, dirt absorption, and biological growth that alter its appearance from its original color. A new finish coat applied over a repair area — even mixed to the original specification — will almost always look lighter, fresher, and more uniform than the surrounding wall. This difference fades over months to years as the new patch weathers, but it’s visible in the interim.
What actually helps
- If the original finish manufacturer and color code are known (sometimes listed in homeowner documents or on the original contractor paperwork), contact the manufacturer for a color match — Senergy-Sika, Dryvit, and Sto all maintain color records
- Apply the finish coat on a cloudy day — direct sunlight dries the acrylic finish unevenly and makes color matching harder
- Feather the repair area as wide as practical — the more gradual the transition, the less visible the boundary
- For larger repairs, consider painting the entire wall surface with a matching elastomeric coating after the repair has cured — this produces a uniform appearance across the whole face and is often the most cost-effective path to an invisible result
For older homes in NJ and PA where the original finish specification is unknown, I sample the existing finish, mix test batches, and apply them to inconspicuous areas to dry and compare in natural daylight — not in artificial light, which shifts color significantly. The comparison has to be done on a dry sample against dry existing material. Even with this process, a perfect match on a 15-year-old wall is rare. The honest conversation with a homeowner is: we can get very close, and it will continue to blend as the new material weathers. For large repairs, the full wall repaint is almost always the cleaner outcome.
Most Common DIY Mistakes in Stucco Repair
- Applying patch to a wet surface — new stucco over elevated-moisture substrate weakens bond and traps moisture. Always confirm the substrate is dry before patching.
- Skipping the mesh reinforcement — unreinforced patch material in a crack will re-crack at the repair boundary within one or two freeze-thaw cycles. The mesh bridges the joint and distributes movement stress.
- Using interior drywall compound or non-stucco patching products — these do not bond correctly to cement stucco, are not weather-resistant, and fail quickly in NJ’s wet conditions. Use only products specifically rated for exterior stucco repair.
- Over-filling and grinding flush — stucco doesn’t sand like drywall. Attempting to grind a raised patch flush removes surface texture and creates an obvious flat spot. Build the repair in layers to the correct height rather than over-applying and cutting back.
- Patching without addressing the water source — this is the most consequential mistake. A patch applied over a window where the head flashing is missing will fail again in the next rain season. Fix the water entry, then fix the surface. In that order. Our stucco repair services page covers what that process looks like professionally.
- Repairing in cold weather — temperatures below 40°F prevent proper curing. Stucco applied in cold conditions that freezes before curing will fail at the patch boundary. Check the forecast: 40°F+ air and surface temperature for a minimum of 48 hours after application.
For keeping repairs from being needed in the first place, our seasonal stucco maintenance guide covers the inspection and maintenance schedule that prevents most of these situations in NJ and PA homes.
Crack repair, moisture damage, section replacement, color matching — Mercer County, NJ & Bucks County, PA
Free on-site consultation before committing to any repair — confirm substrate condition and identify the water source
Frequently Asked Questions
Kamil has repaired stucco cracks, holes, and moisture-damaged sections across New Jersey and Pennsylvania for over a decade. Projects range from Mercer County residential repairs to commercial work for Marriott and Hyatt and the BAPS Swaminarayan Akshardham Temple in Robbinsville, NJ — the largest Hindu temple in the USA.