
How to Clean Stucco Exteriors Safely: A Step-by-Step Guide
Stucco is one of the more forgiving surfaces to clean — but pressure washing it incorrectly causes real damage. This guide covers what actually works, what to avoid, and how cleaning fits into a broader stucco maintenance routine.
Most stucco cleaning is straightforward. The main way it goes wrong is with a pressure washer used at the wrong pressure, angle, or distance — which drives water behind the stucco at exactly the points where it’s most vulnerable. Understanding the constraints makes the job both safer and more effective.
JARART LLC cleans stucco as part of larger repair and painting projects across New Jersey and Pennsylvania. What follows is how we approach it — including the pre-cleaning inspection that catches issues before water makes them worse. For the broader context of how cleaning fits into annual stucco care, see our seasonal maintenance guide.
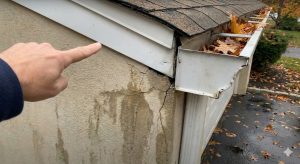
Before You Clean: Inspect First
Cleaning a stucco wall that has open cracks or failed perimeter caulk drives water directly behind the system at those points — the pressure washer does exactly what you’re trying to prevent rain from doing. A five-minute walk-around before any water touches the wall is the most important part of the cleaning process.
What to look for
- Cracks wider than a hairline — cracks above approximately 1/16″ width are open enough to admit pressurized water. Seal these with exterior elastomeric caulk and allow to cure before cleaning.
- Failed or missing perimeter caulk at windows and doors — shrinking, chalking, or pulled-away caulk must be replaced before pressure washing. This is the most common water entry point on stucco homes, and a pressure washer at the wrong angle will exploit it.
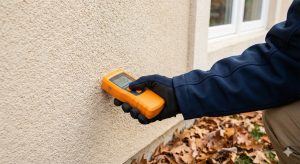
- Loose or hollow sections — tap the wall gently with your knuckle. A hollow sound indicates stucco has delaminated from the substrate. Pressure washing over delaminated areas can cause them to fall away entirely. These sections need professional repair before cleaning proceeds.
- Grade contact at the base — stucco that contacts soil or mulch at grade level is wicking moisture; note for maintenance purposes but doesn’t affect cleaning approach.
Any significant cracks, active delamination, or structural concerns visible during inspection should be addressed before cleaning. For repair guidance, see our stucco repair services page or the stucco lifespan guide for context on maintenance priorities.
Pressure washing stucco with open cracks or failed window caulk is worse than not cleaning at all. The spray forces water into existing openings under pressure — the same mechanism that causes stucco water damage during nor’easters, replicated deliberately. Repair first, clean second.
Tools and Cleaning Solutions
Pressure washer settings
A pressure washer is appropriate for stucco — with strict constraints on pressure, tip, and technique:
- Pressure: 1,000–1,200 PSI maximum — this is substantially lower than what most homeowner pressure washers default to. 2,500–3,000 PSI is common on residential machines and will damage stucco finish coats. Set a specific pressure limit or rent a machine with appropriate output.
- Nozzle: 40-degree wide-angle tip minimum — the wider fan distributes force across more surface area. Never use a 0-degree (red) or 15-degree (yellow) tip on stucco. A 25-degree green tip is acceptable for rinsing on firm, sound hard-coat stucco in good condition; 40-degree is safer for general use.
- Distance: minimum 18–24 inches from surface — distance reduces effective pressure at the wall face. Closer than 18 inches with even moderate pressure can cut through the finish coat texture or force water into micro-cracks.
- Direction: downward only — angling up toward eaves, window heads, or any horizontal surface drives water under flashings and into gaps that face downward toward the ground in normal weather. Always spray at a downward angle.
Garden hose alternative
For routine annual cleaning of stucco in good condition, a garden hose with a spray nozzle is often sufficient and carries no damage risk. The trade-off is less effective removal of heavy biological growth or embedded dirt. For lightly soiled walls, start with the hose; escalate to pressure washing only if needed.
Cleaning solutions by stain type
| Stain type | Recommended solution | Notes |
|---|---|---|
| General dirt and dust | Water only, or mild dish soap + water | Rinse well; soap residue attracts dirt faster |
| Mold / mildew / algae | 1 part bleach : 3 parts water, or commercial mildewcide | Protect plants; allow dwell time before rinsing |
| Efflorescence (white deposits) | Diluted white vinegar or commercial masonry efflorescence cleaner | Muriatic acid for stubborn cases — requires PPE and careful application |
| Rust stains | Oxalic acid-based masonry cleaner | Common near metal fixtures, window hardware |
| Paint or sealant overspray | Mechanical removal or professional assessment | Chemical solvents can damage stucco finish coat |
The Cleaning Process Step by Step
Step 1 — Protect the surroundings
Cover plants and shrubs nearest the wall with plastic sheeting — particularly if using bleach solutions. Move vehicles away from the work area. Wet adjacent landscaping before applying any cleaning solution to reduce absorption of runoff.
Step 2 — Pre-rinse top to bottom
Wet the entire surface with plain water before applying any cleaning solution. This prevents cleaning agents from drying too quickly on a warm, sun-exposed wall before they’ve had time to work. Work top to bottom — dirty runoff goes onto unwashed area below rather than over already-cleaned sections.
Step 3 — Apply cleaning solution
Apply your chosen solution with a low-pressure spray (many pressure washers have a soap/chemical injection setting that operates at very low pressure) or a soft-bristle brush. Work in manageable sections — a wall face rather than the entire house at once — so the solution doesn’t dry before rinsing. Allow dwell time appropriate to the solution: 5–10 minutes for general cleaners, longer for mildewcide products per manufacturer instructions.
Step 4 — Scrub if needed
For textured stucco surfaces with embedded dirt in the valleys of the texture profile, a soft-bristle brush works the solution into the surface more effectively than spray alone. Use gentle circular or downward strokes. Avoid stiff wire brushes, abrasive pads, or anything that can scratch or abrade the finish coat.
Step 5 — Rinse thoroughly, top to bottom
Rinse with plain water until no cleaning solution residue remains — soap and chemical residue on stucco attracts dirt faster and can leave streaking. Maintain the 40-degree tip, downward angle, and 18–24 inch distance throughout. Do not rinse into open window perimeters or under eaves.
Step 6 — Allow to dry fully before evaluating
Wet stucco looks darker and more uniform than dry stucco. Allow at least 48–72 hours of dry conditions before evaluating the cleaned appearance or deciding whether a second pass is needed. What looks like remaining staining while wet often disappears as the wall dries.
Clean stucco on an overcast day or in the morning before direct sun hits the wall. Cleaning in direct afternoon sun on a south or west-facing wall causes the cleaning solution to dry before it has time to work, leaving residue streaks and requiring a second application. Overcast, mild conditions also reduce the risk of accidentally drying cleaning solutions in the texture valleys before they can be rinsed out properly.
Cleaning Mold, Mildew, and Algae
Biological growth on stucco — green algae, black mold patches, or grey-brown mildew — is common in NJ and PA’s humid summers, particularly on shaded north-facing walls and near ground level where moisture retention is higher. It’s a surface condition, not a structural one, in most cases.
The critical distinction: surface biological growth vs. growth indicating moisture intrusion. Algae and mildew on the stucco face is a cleaning issue. Mold concentrated at specific locations — particularly near windows, at the base of walls, or in patterns that follow wall structure — may indicate moisture behind the wall feeding biological growth from inside the assembly. If growth is localized and recurring despite cleaning, have a contractor assess whether the pattern corresponds to a moisture entry point.
Cleaning process for biological growth
- Mix 1 part household bleach (sodium hypochlorite) with 3 parts water, or use a commercial mildewcide rated for exterior masonry
- Protect nearby plants with plastic sheeting; wet adjacent plantings before application to reduce chemical absorption
- Apply solution with a low-pressure sprayer or soft brush — do not power-spray bleach solution onto the wall at high pressure
- Allow a minimum 10–15 minute dwell time; biological growth needs contact time to be killed, not just rinsed away
- Scrub gently with a soft-bristle brush if growth is embedded in texture valleys
- Rinse thoroughly — bleach residue left on stucco accelerates surface degradation over time
- Rinse affected plants after the work area runoff is cleared
Biological growth on north-facing and shaded stucco tends to recur every 2–3 years regardless of cleaning — the conditions that support it (moisture, shade, limited air circulation) persist. A breathable penetrating silane/siloxane sealer applied after cleaning and drying reduces surface moisture absorption and slows regrowth. Improving air circulation by trimming overhanging vegetation also helps. See our stucco painting guide for when an elastomeric coating is a better long-term solution than repeated cleaning cycles.
Cleaning Efflorescence (White Staining)
Efflorescence is the white powdery or chalky deposit that forms on stucco when soluble salts in the cement material migrate to the surface with moisture movement. It’s extremely common on stucco — virtually all cement-based walls produce some efflorescence, particularly when new or after wetting and drying cycles.
Surface efflorescence vs. active moisture indicator
Light efflorescence on new stucco during the first year or two of curing is normal and typically diminishes on its own. Persistent, recurring, or expanding efflorescence on an older wall indicates ongoing moisture movement through the wall — water entering from somewhere, carrying salts to the surface as it evaporates. Cleaning removes the deposit; it does not address the moisture source. If efflorescence keeps coming back, the source of the moisture driving it needs investigation.
Cleaning efflorescence
- Light surface deposits: scrub with a stiff nylon brush (not wire) and plain water — many fresh deposits remove easily with mechanical action alone
- Heavier deposits: apply diluted white vinegar (1:1 with water) and scrub; the acid reacts with the calcium carbonate in the deposit and dissolves it
- Stubborn or extensive efflorescence: diluted muriatic acid (follow manufacturer’s dilution — typically 1 part acid to 10 parts water) applied with a brush, allowed to react briefly, then scrubbed and rinsed thoroughly. This requires PPE — acid-resistant gloves, eye protection, adequate ventilation. Rinse the wall heavily with plain water after treatment to neutralize the acid.
- Never apply muriatic acid to EIFS — the acrylic finish coat is incompatible with acid treatment
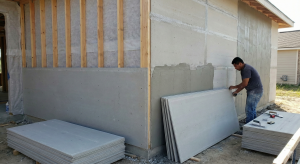
Cleaning EIFS — Different Rules Apply
EIFS (synthetic stucco) requires a more cautious approach than traditional hard-coat for one main reason: the finish coat is a thinner acrylic layer over foam, and the foam substrate beneath it is compressible. High-pressure washing can crack the acrylic finish, drive water into the foam layer, and damage the base coat mesh.
- Pressure: lower than hard-coat — 800–1,000 PSI maximum; many professionals recommend soft-washing EIFS with chemical solution and very low pressure (under 500 PSI) rather than pressure washing
- Chemical cleaning is often preferable — a low-pressure chemical application with a commercial EIFS-compatible cleaner followed by low-pressure rinse is gentler and more effective on EIFS than mechanical pressure
- Avoid acid-based cleaners — muriatic acid and similar products are incompatible with EIFS finish coats
- Inspect for punctures before and after — EIFS foam can be damaged by pressure that would be fine on hard-coat; check for any new indentations or surface damage after cleaning
- No wire brushes or abrasive scrubbers — the acrylic finish coat scratches more easily than hard-coat cement
What Not to Do
- High pressure on textured surfaces — 2,000+ PSI strips finish coat aggregate from textured surfaces, producing a visible lightened or roughened area. The damage is permanent without recoating.
- Angling upward under eaves or into window perimeters — forces water under flashings and into transition gaps. Always spray downward.
- Cleaning over open cracks or failed caulk — as covered above: repair first, clean second. No exceptions.
- Using muriatic acid on EIFS — damages the acrylic finish coat irreversibly.
- Leaving bleach or cleaning solution to dry on the surface — bleach residue accelerates stucco surface degradation; soap residue attracts dirt faster and leaves streaking. Always rinse completely.
- Cleaning in freezing conditions — water driven into any surface porosity or micro-crack freezes and expands, worsening the damage. Clean only when temperatures will stay above 40°F for at least 24 hours after the work.
- Painting or sealing immediately after cleaning — the wall must be fully dry before any coating is applied. Minimum 48–72 hours after cleaning in typical NJ conditions; longer in cool or humid weather. See our stucco painting guide for substrate moisture requirements before coating.
A clean wall shows you things a dirty one hides. After a good spring cleaning, do your annual inspection before the wall dries — wet stucco makes hairline cracks more visible, and freshly wetted walls show staining patterns more clearly than dry ones. We routinely find failed caulk and hairline cracks at window corners during post-cleaning inspection that were obscured by accumulated grime beforehand. Cleaning and inspecting together is a better maintenance routine than either alone.
Cracks, caulk replacement, delamination — address issues found during cleaning before they worsen · NJ & PA
Elastomeric coatings applied over cleaned, prepped surfaces — UV protection and color refresh · NJ & PA
Frequently Asked Questions
Kamil and the JARART LLC team clean, repair, and repaint stucco exteriors across New Jersey and Pennsylvania, often combining all three services in a single project. Over a decade of field work — including the BAPS Swaminarayan Akshardham Temple in Robbinsville, NJ — informs the practical approach described in this guide.